How to Attach and Center a Candle Wick in a Jar (DIY Guide)
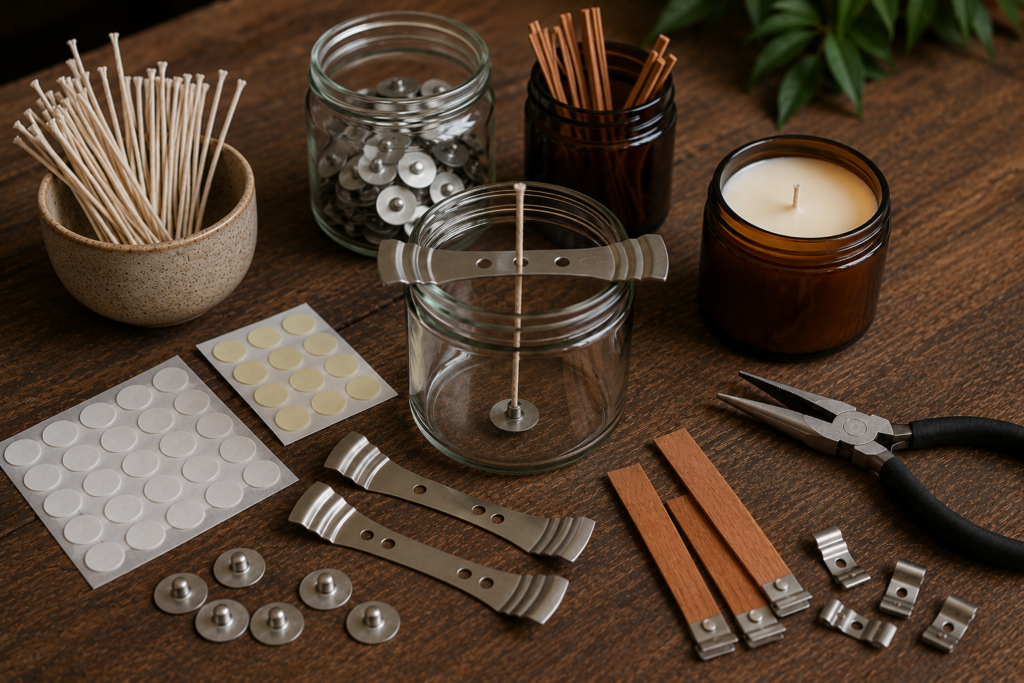
Your wax is ready, your jar is waiting… but now comes the slightly tricky part: attaching and centering your candle wick.
If you’re making candles for the first time, you might be wondering how that little wick actually stays attached to the bottom of the jar. And once you’ve managed to stick it down, how do you stop it from leaning to one side while you pour the wax?
The good news is that you don’t need a complicated setup to do it properly.
In this guide, we’ll go through how to attach a candle wick to a metal wick tab, secure it to the bottom of a jar and keep it centered while your candle cools. We’ll also look at some simple homemade alternatives if you’re working with basic materials, as well as a separate section for wooden wicks.
One thing that is useful to understand from the beginning is that attaching and centering a wick are actually two different jobs.
The bottom of the wick needs to be secured to the bottom of the container.
The top of the wick needs to be held upright and centered while the wax cools.
Once you understand that, the whole process becomes much easier.
What You’ll Need
Depending on the method you choose, you may need:
- A candle wick
- A metal wick tab or wick sustainer
- Pliers
- Wick stickers or adhesive dots
- A wick-centering tool or wick bar
- Alternatively, a clothespin, wooden peg, chopsticks, pencils or another homemade centering method
- A clean candle jar or container
If you’re planning to make your own cotton wicks, you may also want to read How to Make a Cotton Candle Wick at Home before continuing with this guide.
What Is a Wick Sustainer or Wick Tab?
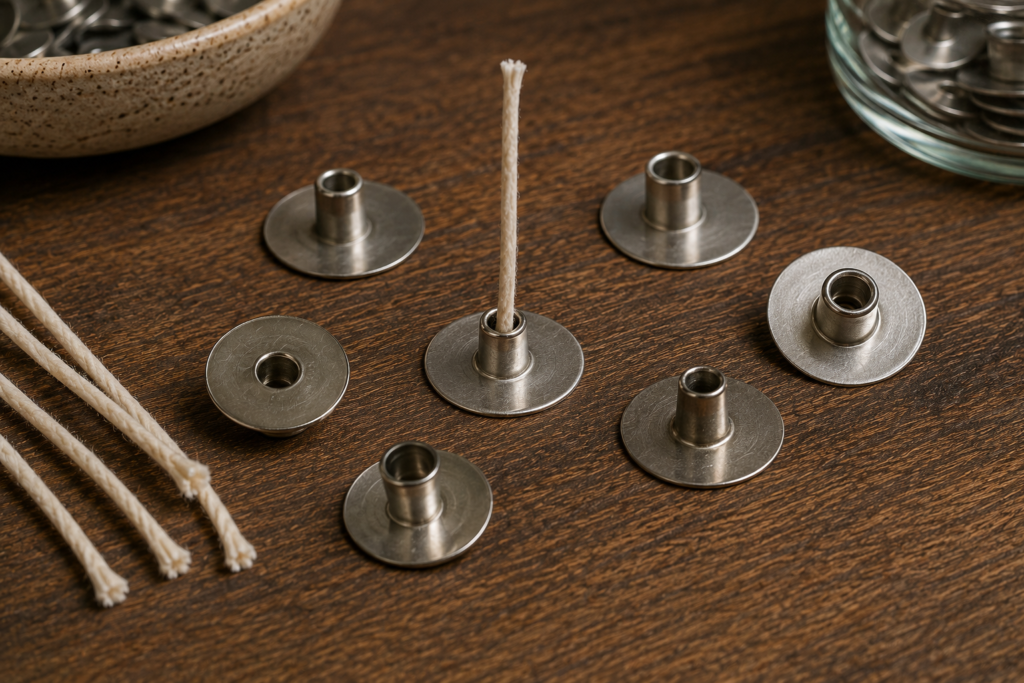
If you’ve ever looked at a pre-made candle wick and wondered what the little metal piece at the bottom is called, you’re not alone.
That small metal component is usually called a wick tab or wick sustainer.
Its job is to create a base for the wick so that it can be attached to the bottom of a candle container.
Pre-tabbed wicks already have this metal piece attached, but if you’re making your own cotton wick at home, you can buy wick tabs separately and attach them yourself.
Most standard wick tabs have a small opening or neck where the wick can be inserted. Once the wick is in position, the metal can be gently crimped with pliers to help keep the wick in place.
How to Attach a Wick to a Metal Wick Tab
f you’re starting with an untabbed cotton wick, this is the first step.
1) Insert the Wick Through the Opening
Take one end of your wick and carefully feed it through the small opening in the wick tab.
Depending on the type of tab you’re using, you may find that a firm, wax-coated wick is easier to insert than a very soft piece of cotton string.
2) Pull the Wick Into Position
Pull the wick through until you have enough length on the other side for the height of your candle container.
You don’t need to cut everything perfectly at this stage. It’s usually easier to leave yourself some extra length and trim the wick later.
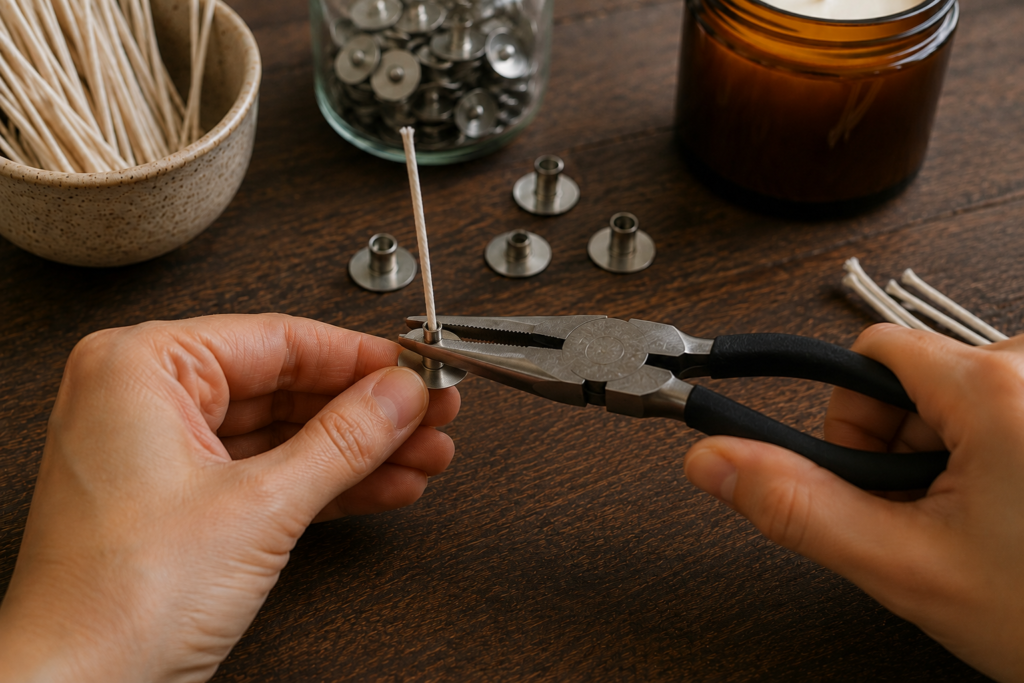
3) Crimp the Metal Neck
Using pliers, gently press the metal neck around the wick.
You want the wick to be held securely, but there is no need to crush or damage the fibres.
If the tab has been properly crimped, the wick should stay in place rather than sliding freely through the opening.
4) Give It a Gentle Check
Before attaching the wick to your jar, gently pull on it to make sure it is secure.
If it moves too easily, adjust the crimp before continuing.
It’s much easier to fix a loose wick tab now than after it has been attached to the bottom of a candle container.
How to Attach the Wick Tab to the Bottom of Your Candle Container
Once your wick is attached to the metal tab, it’s time to secure the tab inside the jar.
The container should ideally be clean and dry before applying any adhesive.
There are several methods you can use.
Wick Stickers or Adhesive Dots
Wick stickers are small adhesive pads designed specifically for attaching a wick tab to the bottom of a candle container.
Simply attach the sticker to the underside of the metal tab, remove the backing and press the tab firmly onto the bottom of the jar.
This is one of the easiest methods, especially if you’re making several candles at once.
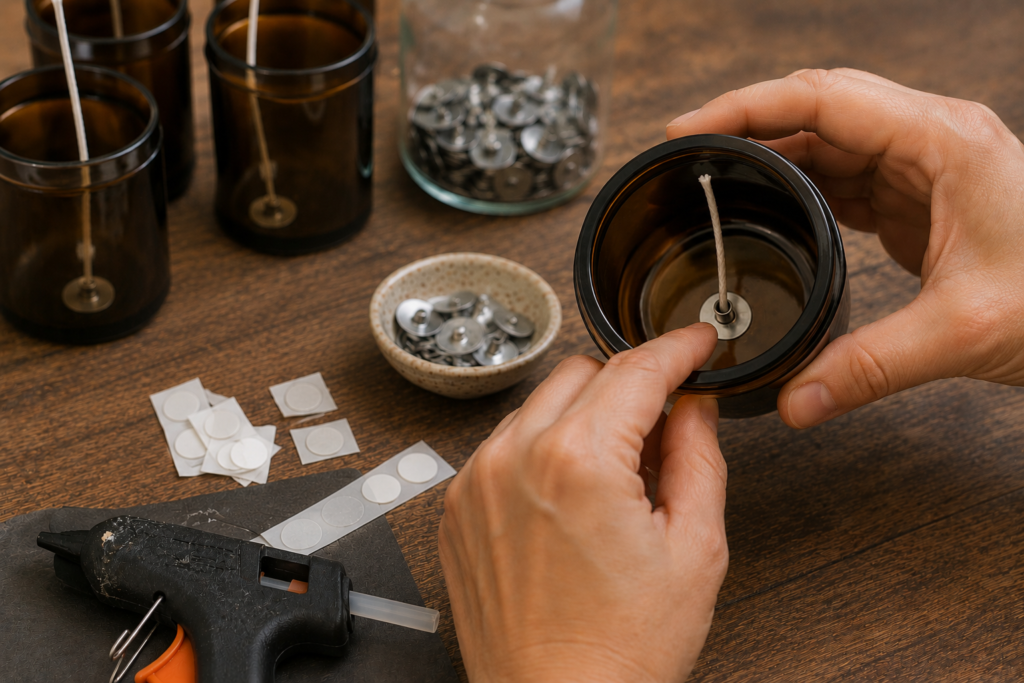
Hot Glue as a Homemade Alternative
If you’re making candles with basic materials at home and don’t have wick stickers, a small amount of hot glue can also be used to secure the metal tab.
Apply a small amount of glue to the bottom of the tab and carefully press it into position inside the container.
Allow the glue to set before moving the wick or pouring your wax.
Be careful not to use so much glue that the tab sits unevenly at the bottom of the container.
Other Suitable Wick Adhesives
There are also other adhesives specifically designed for candle making.
The most important thing is that the wick tab remains securely attached while you pour the wax and while the candle cools.
If the adhesive releases too early, the entire wick can shift out of position.
How to Find the Center of Your Candle Jar
Before pressing the wick tab down permanently, take a moment to think about where the actual center of your container is.
For a round glass jar, you can often judge the center by looking directly down into the container from above.
For square, rectangular or unusually shaped containers, finding the center can take a little more attention.
If you’re making multiple candles using the same container, you could even create a simple template for yourself. Marking the center of a reusable guide can save time when you’re preparing several jars.
The important thing is to check the position from directly above, rather than only from the side.
A wick can look centered from one angle while actually sitting slightly off to one side.
Once you’re happy with the position, press the wick tab firmly onto the bottom of the container.
How to Center the Candle Wick
Now that the bottom of the wick is attached, you need to keep the top of the wick upright.
This is where wick-centering tools come in.
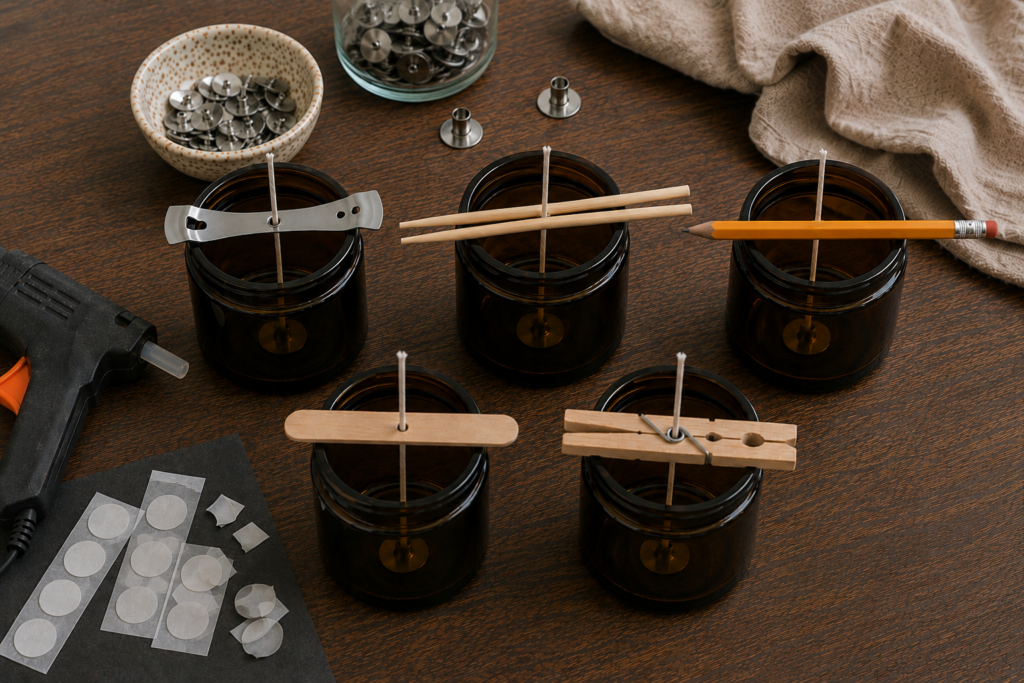
Metal or Wooden Wick-Centering Bars
A wick-centering bar is one of the simplest options.
The bar sits across the top of your candle container and holds the wick in the middle through a slot, opening or other positioning system.
These are particularly useful if you’re making multiple candles because they make the process faster and more consistent.
You can find them in different materials, including metal and wood.
Clothespins or Wooden Pegs
A regular clothespin can also work surprisingly well.
Simply position the wick between the two sides of the peg and rest it across the top of the container.
This is a particularly useful option if you’re experimenting with candle making at home and don’t want to buy a separate centering tool straight away.
Just make sure the peg isn’t pulling the wick strongly to one side.
Chopsticks or Pencils
Another simple DIY method is to place two chopsticks or pencils across the opening of the container.
The wick can be positioned between them and adjusted until it stands upright.
This may not look as neat as a dedicated wick-centering tool, but it can work well for basic candle-making projects.
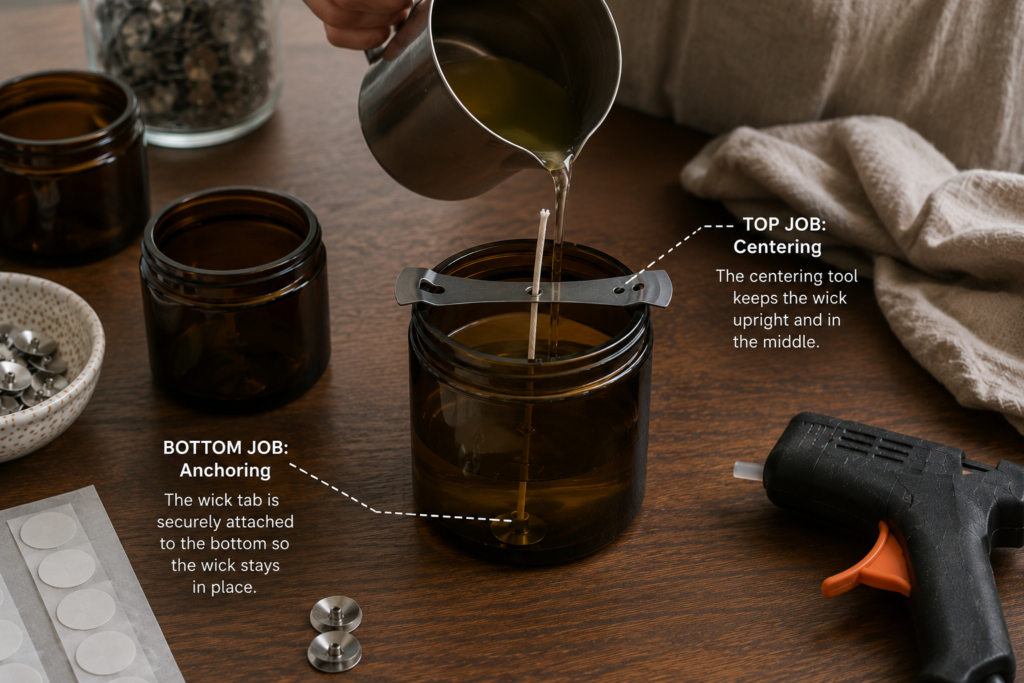
The Bottom and Top of the Wick Have Different Jobs
This is worth repeating because it’s one of the easiest things for beginners to overlook.
The wick tab and adhesive are responsible for keeping the bottom of the wick in position.
The wick-centering bar, peg or homemade tool is responsible for keeping the top of the wick upright and centered.
Using only one of these methods may not always be enough.
For example, you could attach the wick tab perfectly to the bottom of the jar, but if you don’t support the top, the wick may lean while the wax cools.
On the other hand, a centering tool at the top won’t necessarily prevent the wick tab from coming loose at the bottom.
Using both gives you a much more stable setup.
How to Keep the Wick Centered While Pouring the Wax
Once your wick is attached and supported, you’re ready to pour.
Try to avoid knocking or pushing the wick while adding the wax.
A slow and controlled pour can make it easier to avoid disturbing your setup, especially during the first part of the pour.
If possible, avoid pouring directly onto the wick or centering tool.
After pouring, take another quick look at the wick from above and from the side.
Ask yourself:
- Is it still centered?
- Is it standing upright?
- Has the wick shifted while pouring?
- Is the centering tool still sitting evenly across the container?
If everything looks good, leave the candle on a stable, level surface and allow the wax to cool.
Try not to move the container unnecessarily while the wax is still liquid.
How Long Should You Leave the Centering Tool in Place?
Leave the centering tool, peg or other support in place until the wax has cooled and solidified enough that the wick can stand on its own.
Removing the tool too early can allow the wick to lean or shift.
Once the candle has completely cooled, remove the centering tool and trim the wick to the appropriate length for your finished candle.
How to Center a Wick in a Deep or Narrow Jar
Deep or narrow containers can be more difficult because reaching the bottom of the jar with your fingers may not be possible.
This is where a simple homemade method can be particularly useful.
You can use a long, narrow object to help guide the wick tab down to the bottom of the container. A drinking straw or similar lightweight tube can make it easier to position the wick while you press the tab into place.
Once the tab is secured, remove the guide and use a centering tool across the top of the jar as usual.
This method can be especially useful for tall containers where placing the wick tab accurately would otherwise be awkward.
How to Attach and Center a Wooden Wick
Wooden wicks work a little differently from traditional cotton wicks.
Instead of being threaded through a standard metal wick tab, a wooden wick is usually held inside a wooden wick clip or sustainer designed for its shape.
The wooden wick is inserted into the clip, and the metal base of the clip is then attached to the bottom of the candle container using a suitable adhesive, or homemade methods like hot glue
Once it is attached, the same basic principle applies:
- The metal base is secured to the bottom of the container.
- The wooden wick needs to remain centered and upright while the wax cools.
Because wooden wicks are flatter, bigger and heavier than cotton wicks, you don’t usually need a wick sustainer at the top of your jar. If you secure well the metal base to the bottom of the container, the wick will stay in place by itself.
Another type of way you can go about it (given the strength the wooden wick has in and of itself) is just placing the wick inside the container, and then use a form of wick sustainer in the top of the jar to make the wooden wick stay in place, like chopsticks or pencils.
In other words with wooden wicks you don’t need the double securing system you need with cotton wicks.
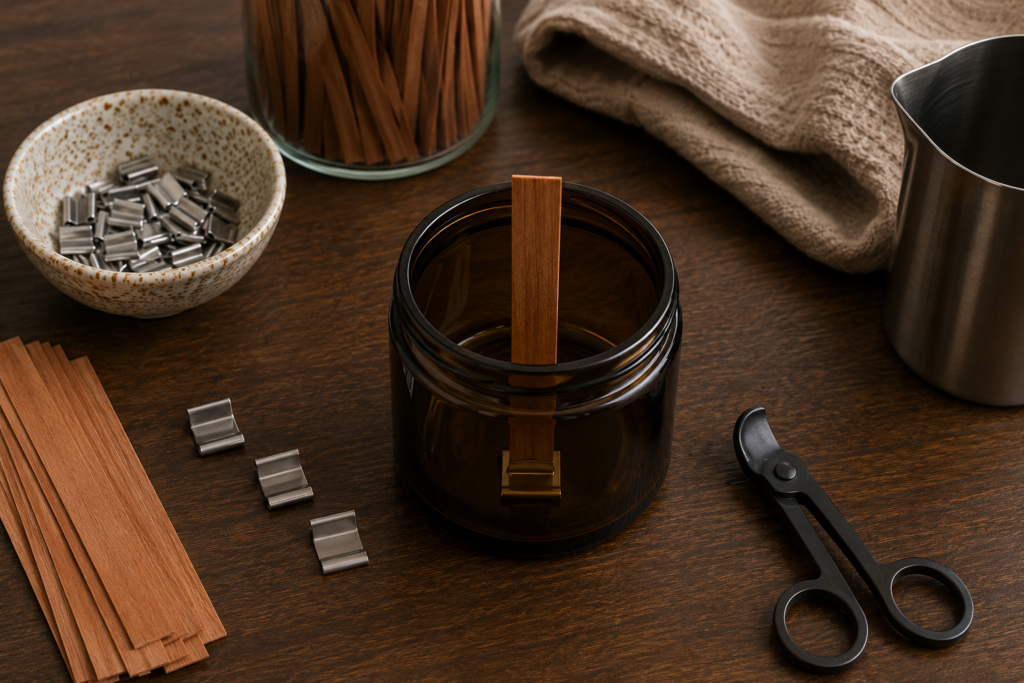
A Quick Note About Wooden Wick Clips
Make sure the wooden wick fits securely inside its metal clip.
If the wick is too loose, it may move while you’re pouring.
If it is too wide for the clip, forcing it into place could damage the wick.
If you’re interested in making your own wooden wicks rather than buying pre-made ones, you may also want to explore our guide on How to Make Wooden Candle Wicks at Home.
What About Double-Wick or Multi-Wick Candles?
If your candle container uses two or more wicks, centering becomes even more important.
Instead of simply placing one wick in the middle, you’ll need to position the wicks evenly across the container.
A multi-wick centering tool can make this easier, but you can also create a simple template based on the shape and size of your container.
Before pouring the wax, look at the container from directly above and check that:
- the wicks are evenly spaced;
- the wicks are standing upright;
- none of the wicks are leaning toward the container wall;
- the positioning looks balanced.
Multi-wick candles should also be properly tested because wick placement is only one part of achieving a good burn.
Common Wick Placement Problems
Even when everything looks perfect at the beginning, small problems can appear while pouring or cooling.
Here are some of the most common ones.
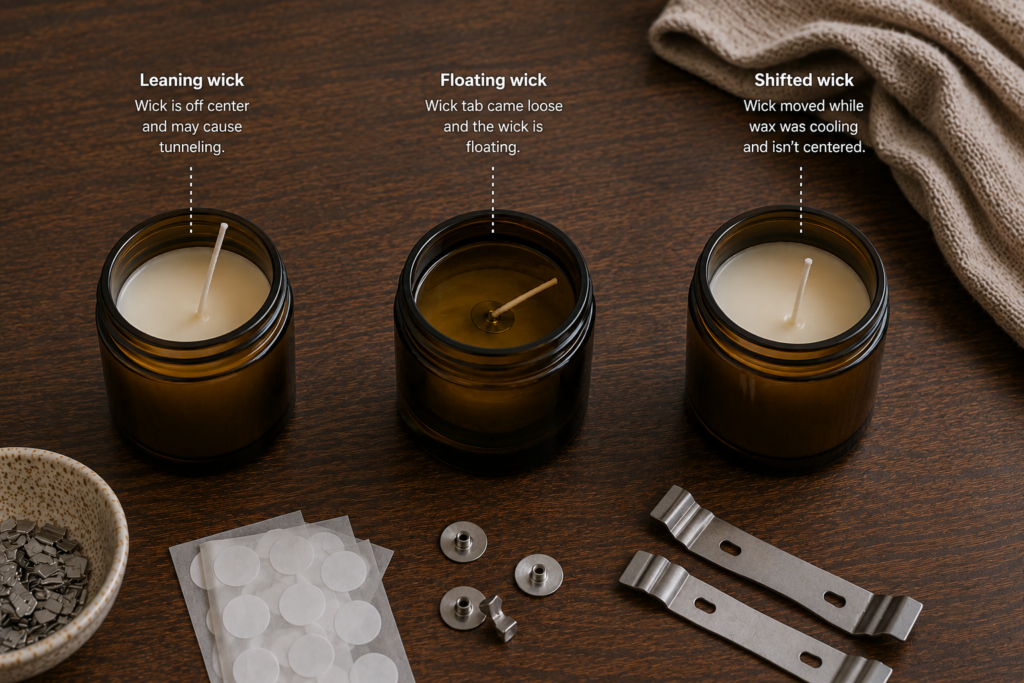
My Wick Keeps Leaning
The wick may not be supported properly at the top.
Check that your centering bar, peg or other tool is holding the wick upright without pulling it to one side.
If you’re using a homemade cotton wick, it may also be too soft. Adding another wax coating can help make a homemade wick stiffer and easier to position.
My Wick Tab or Adhesive Comes Loose
Make sure the bottom of the container is clean and dry before attaching the wick.
The wick tab should also be pressed firmly into position before you pour the wax.
If the tab keeps coming loose, try a different adhesive method or make sure the adhesive has had enough time to set.
My Wick Is Off-Center
If you notice the problem before the wax has completely hardened, you may still be able to make a small adjustment.
Check the wick from directly above and gently reposition it if necessary.
For future candles, spend a little more time finding the center before attaching the wick tab.
My Wick Floats or Moves Upward
This usually means that the bottom of the wick wasn’t secured firmly enough.
The centering tool at the top may still hold the wick straight, but it cannot replace a properly attached wick tab at the bottom.
My Wick Tab Doesn’t Fit My Homemade Wick
If you’re making your own cotton wick, the thickness of the finished wick may not match the opening in every metal tab.
Try choosing a tab that is suitable for the thickness of your wick rather than forcing the wick through an opening that is too small.
You may also need to experiment with different tab sizes if you’re testing single, double or multi-strand homemade wicks.
The Wick Shifts While I’m Pouring
Make sure the wick is secured at the bottom and supported at the top before pouring.
A slow, controlled pour can also help reduce the chances of accidentally pushing the wick out of position.
After pouring, check the alignment one more time before leaving the candle to cool.
Final Check Before You Pour
Before pouring your wax, take a few seconds to check your setup.
Make sure:
- the wick tab is securely attached to the bottom of the container;
- the wick is positioned in the correct place;
- the wick is standing upright;
- the centering tool is stable;
- the container is resting on a level surface.
It might seem like a small detail, but taking a moment to check everything now can save you from having to fix an off-centered wick later.
If your wick is attached well and you still run into burning problems, you can check out our list of Common Candle Problems and How to Fix Them for more troubleshooting support.
We hope you liked this guide, let us know if you have any further questions by leaving a comment, we really appreciate the feedback of our community!